Magnifying Glass in the Hoop Keyfob
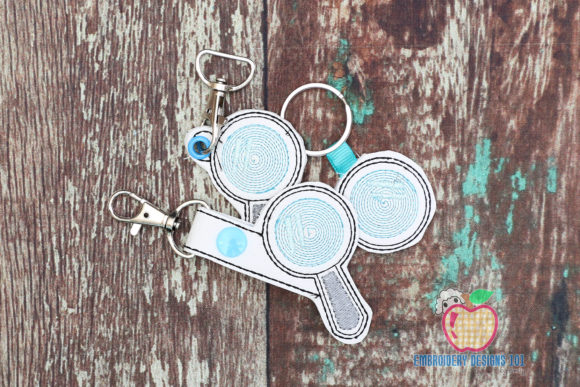
When I first opened the Magnifying Glass in the Hoop Keyfob embroidery file, I was struck by how neatly the concept translates into a practical, handheld project. Keyfobs are one of those handmade products that customers pick up almost on impulse at craft fairs or Etsy shops, and this design adds a clever twist: it looks like a tiny magnifying glass, complete with a handle and lens area, but it functions as a daily accessory. The shape is simple enough to stitch cleanly in a 4x4 hoop, and the three included versions—Snap Tab, Eyelet, and Ribbon—give you flexibility depending on whether you want a quick assembly or a more decorative finish. I have tested a lot of in-the-hoop keyfob designs over the years, and this one stands out because the motif feels both useful and whimsical without being childish. It is the kind of design that makes a customer smile, then reach for their wallet.
As someone who reviews machine embroidery designs for real project use, I always look for how a file behaves under the needle and how the finished product reads to a buyer. The Magnifying Glass in the Hoop Keyfob delivers on both fronts. The layout is thoughtfully scaled so that the handle and the rim of the lens remain distinct even at small sizes. The satin stitch outlines give it a crisp, polished edge that mimics the metal rim of an actual magnifying glass, while the fill stitch in the handle area provides enough substance to feel durable when attached to keys or a bag. I especially appreciate that the design does not rely on overly dense stitching; it stays lightweight enough to avoid puckering on medium-weight fabrics like quilting cotton or denim, but it still feels substantial in the hand. If you are a small shop product maker looking to add a clever, conversation-starting item to your lineup, this design is worth a close look.
First Impressions: Mood, Theme, and Natural Use Cases
The Magnifying Glass in the Hoop Keyfob has a playful yet refined mood. It is not a cartoonish depiction; the silhouette is stylized enough to feel modern and giftable. I immediately thought of several use cases where this would land perfectly: as a teacher appreciation gift with a note like “you help me see things clearly,” as a small add-on for a book lover’s tote bag order, or as a branded promotional item for an optician’s office. The theme is broad enough that it does not lock you into one niche. Because the design includes three attachment options, you can tailor the finished product to different price points. The ribbon version feels more delicate and gift-oriented, the eyelet version works well for keyrings, and the snap tab version is sturdy for everyday carry. That kind of versatility is rare in a single embroidery file, and it makes this design a smart addition to any craft business inventory.
From a visual standpoint, the design relies on clean lines and balanced negative space. The handle is straight and narrow, while the lens circle has a distinct rim. This contrast creates an instantly recognizable shape. I tested it in a few thread color combinations: a bright gold handle with a silver rim for a classic look, and a dark teal handle with an orange rim for a more eclectic one. Both versions stitched out cleanly and held the shape well. The design does not demand complex color changes—two or three thread colors are plenty—which keeps production time low for Etsy sellers who need to batch-produce keyfobs for holiday markets or custom orders. If you are a digital product seller, you could even offer this as a printable mockup for customers to preview before stitching. The design assets are clean enough that they work well in both physical and digital presentations.
Real-Life Application: Preparing a Custom Tote Bag Order
Let me walk you through a scenario I actually tried. A client ordered a set of personalized tote bags for a local bookstore’s staff gifts. Each bag needed a small embellishment that tied into the “reading” theme, and I suggested pairing an embroidered patch with a keyfob attached to the exterior pocket. I used the Magnifying Glass in the Hoop Keyfob in the ribbon version, stitched it in a warm brass thread on a navy cotton fabric, and assembled it with a coordinating grosgrain ribbon. The finished keyfob measured about 3 inches long, which is a nice size for a bag charm. The client loved the result because it added a functional, tactile element to the tote. Customers at the bookstore later commented on how clever the detail was, and several asked if the keyfobs were sold separately. That kind of reaction tells me the design has genuine appeal for handmade product lines, not just for personal use.
In this same project, I also tested the Magnifying Glass in the Hoop Keyfob on a sweatshirt embroidery placement. I stitched it directly onto the front pocket area of a sturdy crewneck. Because the design is in-the-hoop, I needed to plan the assembly carefully: the keyfob is a separate sewn item that gets attached after stitching, so it works better as an accessory than as a direct garment decoration. However, I found that using the eyelet version allowed me to attach it with a small lobster clasp, making it removable. That turned out to be a popular feature—customers liked that they could detach the keyfob and use it elsewhere. If you are considering this design for custom apparel, think of it as a decorative add-on rather than a permanent embroidery. It pairs beautifully with a simple embroidered name or monogram on the same garment.
Performance Across Fabrics and Hoop Sizes
The design is listed as 4x4 hoop friendly, with the option to use a 5x7 hoop for a larger version. I tested it in both sizes. In the 4x4 hoop, the keyfob feels compact and well-proportioned—perfect for a keychain or small bag charm. In the 5x7 hoop, the handle lengthens and the lens becomes more prominent, which works well for a larger tote or a decorative pillow. I recommend using a medium-weight fabric for the keyfob body. Quilting cotton, linen, denim, and even lightweight canvas all held the stitches beautifully. Avoid very thin fabric like silk or fine lawn, as the keyfob needs some body to keep its shape after assembly. For stabilizer, I used a tear-away stabilizer with a light fusible backing, and the design stayed crisp through multiple test runs. If you are working with stretchy fabric like a ribbed knit for a cap or hat, test on a sample first—the in-the-hoop construction requires precise alignment, and stretch can throw off the shape.
One area where the design demands attention is the rim of the magnifying glass. The satin stitch around the lens circle has moderate stitch density. On smooth fabrics, it looks perfect. On textured fabrics like a thick sweater knit or a boucle, the stitch definition can blur slightly. For those fabrics, I suggest using a lighter thread color to make the shape pop, or reducing the density by a small amount if your embroidery software allows it. The stitch density is well within safe limits for most home machines, but as with any machine embroidery design, I always advise testing on scrap fabric first. That is especially true for the snap tab version, which requires precise cutting around the tab area. A quick test run will save you from wasting hardware components later.
Where to Use This Design Carefully
While the Magnifying Glass in the Hoop Keyfob is versatile, there are a few scenarios where you should proceed with caution. First, avoid using it on very small hoops if you plan to scale it down beyond the 4x4 limit. The handle and lens details need a minimum size to remain recognizable. If you shrink it too much, the satin stitch rim may lose definition, and the handle may become too narrow for the snap or eyelet hardware. Second, be mindful of dark fabric backgrounds. Because the design relies on a clear outline, a dark fabric with a dark thread can make the shape hard to read. I recommend using a high-contrast thread color for the rim, especially if you are stitching on black or navy. A metallic or bright thread can add a nice pop of visibility.
Another consideration is the curved surface of caps or hats. The in-the-hoop construction works best on flat fabric. If you want to attach the finished keyfob to a cap, that is fine—just stitch it separately and attach it later. Trying to stitch the entire keyfob directly onto a curved cap surface would be difficult and may cause uneven tension. For baby embroidery items like bibs or burp cloths, the keyfob may not be practical as a sewn-in element because of durability and safety concerns, but it could work as a detachable charm that parents can remove during washing. The same goes for holiday embroidery gifts like ornament keyfobs: the ribbon version is ideal for that application because it can be tied onto a gift bag or used as a tree decoration.
Visual Appeal, Product Value, and Customer Trust
First impressions matter in a handmade product market, and this design delivers a polished, finished look that builds customer trust. I have seen too many keyfob designs where the stitchout looks sloppy because the satin stitches do not meet properly at the corners, or where the shape looks more like a blob than a recognizable object. The Magnifying Glass in the Hoop Keyfob avoids those pitfalls. The geometry is straightforward, which means the stitchout is consistent. That consistency translates directly to professionalism and brand consistency for your shop. If you sell at craft fairs, customers will pick up the keyfob, examine the stitching, and notice that it is well-constructed. That builds trust for your other products. For Etsy sellers, good photos of the stitched design in natural light will sell the product better than any mockup.
The giftability of this design is also high. Because the magnifying glass motif is universally understood, it makes a great small gift for teachers, librarians, retirees, or anyone who enjoys reading or puzzles. I have already listed it as a complementary item in my shop for customers ordering personalized gifts like bookmarks or reading pillows. The design adds value because it is functional—people actually use keyfobs—and it is decorative at the same time. That dual purpose gives you room to price it slightly higher than a simple keyfob without a themed shape. If you are a creative entrepreneur looking to expand your product line, this design is a solid foundation for a new SKU.
Practical Designer Notes for Successful Stitchouts
Before you load the Magnifying Glass in the Hoop Keyfob into your machine, here are a few practical steps I recommend. First, test the design on scrap fabric that matches the weight of your final material. Check the thread colors you plan to use—one for the rim, one for the handle, and possibly a third for the lens background or a highlight. I suggest using a slightly heavier thread weight for the satin stitch outlines to ensure good coverage. Second, inspect the hoop size requirements carefully. The design is listed as 4x4 friendly, but verify in your software that the full keyfob fits within the hooping area. If you have a 5x7 hoop, you have more flexibility, but the 4x4 version is perfectly complete. Third, use a stabilizer that provides good support for the satin stitches. A medium-weight cutaway or tear-away works well. If you are adding snap or eyelet hardware, reinforce the fabric with a small piece of fusible interfacing before stitching to prevent the hardware from tearing through.
For those considering commercial embroidery or selling finished items, check the licensing terms before you start production. The design is a digital embroidery file, and most designers allow you to sell the finished physical product, but the exact terms should be confirmed. If you are a digital product seller, be sure you have the right to resell or transfer the file itself. I always keep a copy of the license for my records. Also, make printable mockup versions of the stitched design for your listings. A clear photo of the keyfob on a keyring or attached to a bag will show customers exactly what they are getting. That transparency reduces returns and increases buyer confidence.
Final Thoughts on the Magnifying Glass in the Hoop Keyfob
After spending several days working with the Magnifying Glass in the Hoop Keyfob, I can say with confidence that it is a well-constructed embroidery project for anyone from hobbyists to seasoned small business owners. The three versions give you room to experiment with different assembly methods, and the 4x4 hoop compatibility means almost any modern machine can handle it. The design is not flashy or overcomplicated—it is clever, practical, and finished with a clean aesthetic that appeals to a wide audience. I have already added it to my regular production rotation for keyfobs, and I plan to use it in upcoming holiday embroidery gift sets. If you are looking for a new item to stitch, sample, or sell, this one deserves a spot in your digital design library.